Whoopie for Valentine's Day!
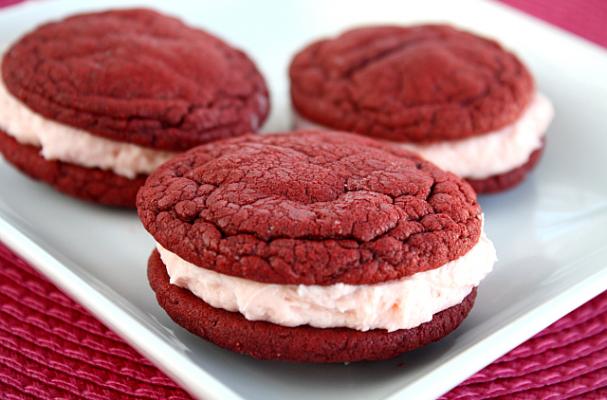
We are talking about whoopie pies people! But seriously, we have an amazingly fun, yet restaurant worthy recipe to please that special someone who's lucky enough to spend Valentine's Day with you! Today's recipe is from our newest member of the team, Ashley Ullrich! In her words:
A whoopie pie is sort of a cross between a cake and a cookie! Looks like a cookie yet tastes like a cross between the two! It's super easy to make and the best part is you can prep it all ahead of time.
Part 1
Cookie Ingredients
- 1 1/2 ounce milk chocolate, chopped
- 12 tablespoons unsalted butter, melted
- 1/2 cup sour cream
- 2 large eggs
- 1 1/2 teaspoons apple cider vinegar
- 1/2 teaspoon vanilla extract
- 1 tablespoon red food coloring
- 2 1/4 cups all-purpose flour
- 1 cup granulated sugar
- 1/4 cup unsweetened cocoa powder
- 2 teaspoons baking powder
- 1/4 teaspoon baking soda
- 1/2 teaspoon salt
Let's Get Started!
Cookie Directions
Preheat the oven to 375 degrees F and line two large baking sheets with parchment paper. Place chocolate in a microwave-safe bowl and microwave at 50% power until melted, about 2 minutes. Whisk until smooth.
In bowl, add melted butter, sour cream, eggs, vinegar, vanilla and food coloring, whisking until combined. In another bowl, whisk the flour, sugar, cocoa powder, baking powder, baking soda and salt.
Next, combine the two mixtures together in four equal batches, whisking each batch completely before adding the next. Stir in the melted chocolate.
Scoop heaping tablespoonfuls of batter onto the prepared baking sheets and smooth the tops with a damp finger. Keep in mind they will spread and puff a bit, about the size of a mason jar lid, so leave enough space in between each. Bake until the cookies spring back when lightly pressed, 8 to 10 minutes. Let cool 10 minutes on the baking sheets, then transfer to racks to cool completely.
{ this recipe makes quite a few whoopies, about 18! Cut the batch in half if you're like us and can't trust yourself to keep the rest around }
Part 2
Now onto the filling! This requires a bit of hunting, as you'll need to find Rose Water which most specialty liquor stores sell. If you're in the Reno/Tahoe area, Total Wine and More and Ben's Fine Wine and Spirits sell it in Reno. AND while you're there, you might as well pick up some La Marca Prosecco which will pair amazingly with this dessert! What beats chocolate and sparkling wine? The answer is: pretty much nothing.) If, for whatever reason you cannot find it, just make the mousse and omit the rosewater for a classic white chocolate mousse.
Rose And White Chocolate Mousse Ingredients
- 4 egg whites
- 1/3 cup white sugar
- 2/3 Cup Heavy Whipping Cream
- 1 tsp rosewater
Directions
Place the chocolate in a heatproof bowl over a saucepan half-filled with simmering water (make sure the bowl doesn’t touch the water). Use a metal spoon to stir for 3-4 minutes or until the chocolate melts. Remove from heat.
Use an electric beater to beat the egg whites in a medium, clean, dry bowl until firm peaks form. Add half the sugar and beat until the sugar dissolves. Add the remaining sugar and beat until glossy. Add the cream and beat until the mixture thickens. The next part you'll need to do by hand. Add the white chocolate and rosewater and use a metal spoon to fold until just combined. Do not over fold your mousse or it will fall and be runny! Optional : Add a tiny bit of red food coloring in this step to tint your mousse pink. Place in the refrigerator to set for about 3-4 hours before spooning or piping them into your whoopie pies.
Time to Get Artistic!
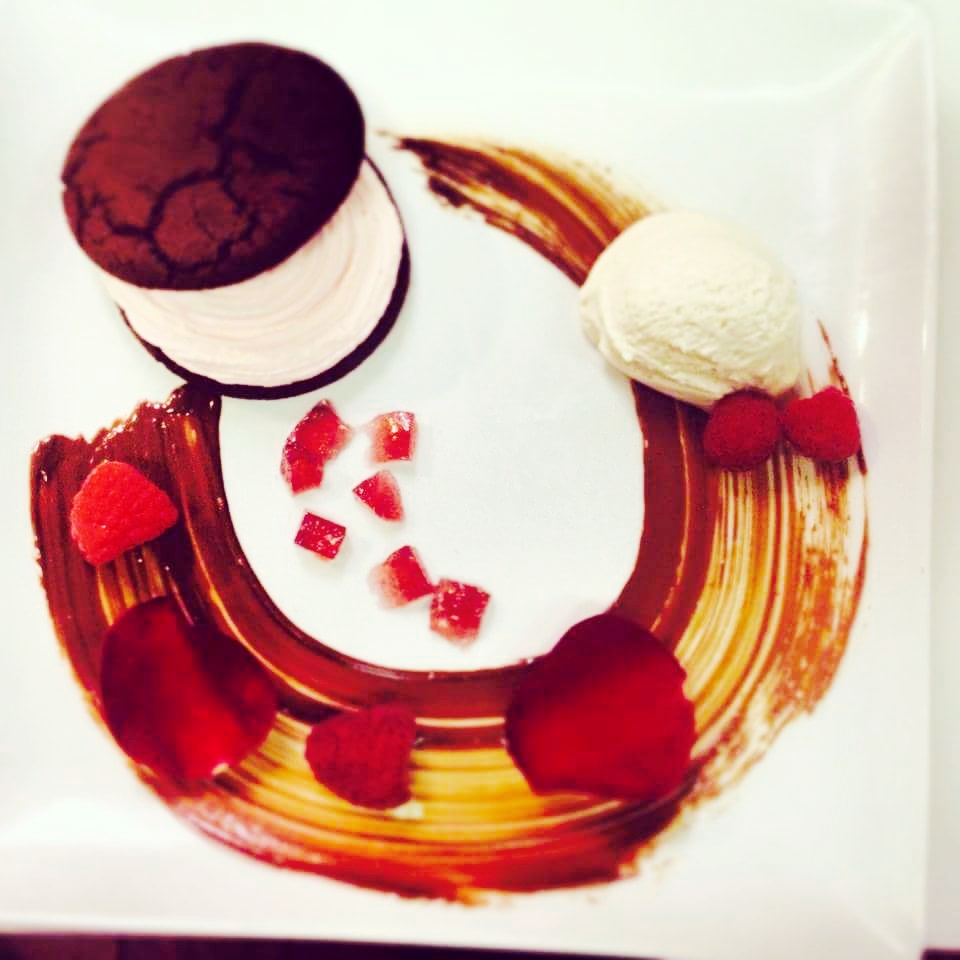
You can paint your plates ahead of time, just leave them on the counter somewhere and don't refrigerate (it will crack in the cold). I know it looks super fancy, but this is so easy! Take a brand new clean paint brush that is about 3 inches in width (you can find them at the dollar store or any home improvement store). Take some of your leftover chocolate and heat it up either using the microwave or the double boiler method. Dip your paintbrush in the melted chocolate. Make sure it's nice and coated, but not dripping. In a semi circle motion, paint your plate! Practice makes perfect. Even ours isn't perfect, but we like a few artistic flaws here and there.
Tip: Whether you are receiving or giving roses this year, steal a few petals and stick them in the fridge. Come dessert time, use them to garnish the plate, like we did in the photo below!
Almost finished!
Alright, now that your mousse has chilled and your whoopies are cool, it's time to assemble your whoopie pies! I like to assemble them closer to eating, they tend to hold up a bit better. Take a plastic sandwich bag or ziploc bag and very gently fill it with your rose or white chocolate mousse. Snip a half inch off one corner and voila! Piping bag. Now take a whoopie, starting in the middle, pipe your mousse on in a circular motion until it reaches the outside edges. Now top it with another whoopie! Place on your painted plate, garnish with a few raspberries, a scoop of vanilla ice cream AND don't forget those stolen rose petals I mentioned earlier! If you decide to assemble them a bit ahead of time, just stick the pies back in the fridge, lightly cover them with saran wrap, and grab them when its plate decorating time!
Enjoy!